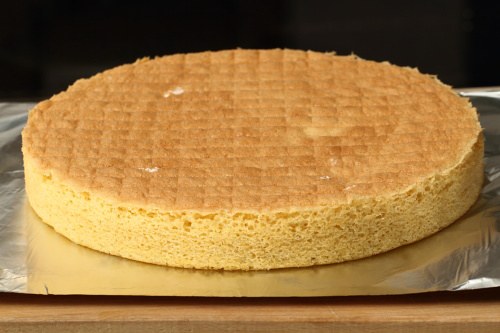
Sponge Base
A versatile, simple butter sponge base suitable for cakes of any diameter, providing tender crumb and balanced flavor that serves as the perfect foundation for fillings, frostings, and creative applications.
Overview
Sponge base is a simplified, diameter-flexible version of larger butter sponge cakes, allowing bakers to create cakes of any size using standardized proportions. The technique combines aeration (ribboned egg yolks with sugar, whipped whites), careful folding to preserve airiness, and variable baking time adjusted to mould diameter. The result is a tender, versatile sponge with balanced flavor and fine crumb, equally suited to small individual cakes, medium 22-centimeter layers, or large tortes. Success depends on achieving proper ribbon consistency, meticulous folding technique, and understanding the relationship between mould/sponge thickness and required baking time.
Ingredients
Egg & Sugar Base
- 6 eggs (large, separated into yolks and whites, approximately 100 grams yolks, 180 grams whites)
- 190 grams caster sugar (sifted, divided: ⅔ with yolks, ⅓ with whites)
Flour
- 180 grams cake flour (or soft flour, sifted)
Equipment
- Tin or flan ring of desired diameter (22-centimeter is standard; adjust baking time for other sizes)
- Parchment paper (optional but helpful)
Method
Stage 1 - Prepare Tin
- Preheat the oven to 190°C (375°F).
- Lightly butter the inside of a tin or flan ring of your chosen diameter (22-centimeter is standard; smaller diameters reduce baking time, larger diameters increase it).
- Line the bottom with parchment paper (optional).
Stage 2 - Ribbon Egg Yolks with Sugar
- Separate 6 eggs into yolks in one bowl and whites in another (ensure no yolk contaminates whites).
- Place 6 egg yolks and approximately ⅔ of the 190 grams sugar (approximately 127 grams) into the yolk bowl.
- Beat with an electric mixer until the mixture becomes pale, light, and forms a ribbon when the whisk is lifted.
- This ribbon stage is essential and indicates proper aeration.
- The yolk mixture should feel thick and mousse-like with noticeably increased volume (approximately 3-4 times original).
- Beating time approximately 8-10 minutes depending on mixer speed.
Stage 3 - Whip Egg Whites
- In a separate, Very clean bowl (any fat prevents whipping), place the 6 egg whites.
- Using a clean mixer or whisk, beat the whites until soft peaks form and they hold their shape.
- Gradually add the remaining ⅓ of the sugar (approximately 63 grams), continuing to beat at slightly higher speed.
- Beat for exactly 1 minute after the sugar is added.
- The whites should become very stiff with firm, glossy peaks forming.
Stage 4 - Fold Whites into Yolk Mixture
- Using a flat slotted spoon or rubber spatula, fold approximately one-third of the whipped whites into the yolk mixture.
- Blend thoroughly but gently until the mixture is perfectly blended.
- Add the remaining whites all at once and fold them very gently into the mixture using a gentle J-stroke folding motion (scrape down the side, fold up and over).
- Take care not to over-fold (over-mixing deflates the whites).
- Stop as soon as the color is uniform and no white streaks are visible.
Stage 5 - Fold in Flour
- Sift the 180 grams flour directly over the mixture.
- Using the same folding technique, gently fold the flour in.
- Mix continuously but gently until the flour is completely homogeneous.
- Stop immediately when the mixture is homogeneous; over-mixing creates a heavy, dense sponge.
Stage 6 - Pour into Tin
- Immediately pour the mixture into the lightly buttered and floured tin or flan ring.
- Level the surface gently with a pastry scraper or palette knife (do not compress, maintain airiness).
Stage 7 - Bake (Variable Time by Diameter)
- Place immediately in the preheated 190°C oven.
- Baking time varies significantly by mould diameter and therefore sponge thickness:
- 15-18 minutes: Extra-large thin sponges (30+ centimeter diameter)
- 20-25 minutes: Standard 22-centimeter sponge (most common)
- 12-15 minutes: Medium-sized sponges (18-20 centimeter diameter)
- 8-12 minutes: Individual-sized or small cakes
- The sponge is done when a toothpick inserted into the center comes out clean or with just a faint moist crumb (not wet with batter).
- The top should be golden and spring back when lightly touched.
Stage 8 - Unmould & Cool
- As soon as cooked, invert the sponge onto a wire rack.
- Remove the tin immediately (leaving it on creates condensation that softens the bottom).
- If using parchment, peel it off while the sponge is still warm or completely cool (remove in the state that feels natural, either direction works).
- Allow the sponge to cool completely on the wire rack (approximately 1-1 ½ hours total).
Stage 9 - Quarter-Turn Cooling
- To prevent the sponge from sticking to the rack or developing a flat spot, rotate it one-quarter turn every 15 minutes during cooling.
- This takes approximately 4 rotations over the full cooling period.
- Continue until the sponge has cooled completely.
Stage 10 - Rest
- Once completely cooled, wrap the sponge in cling film or place in an airtight container.
- Allow to rest at room temperature for at least 4-6 hours, or preferably overnight (24 hours).
- Overnight resting improves texture and makes the sponge easier to slice and handle.
Notes
- Ribbon Consistency Essential: Yolks must achieve ribbon stage for proper aeration and structure. Weak aeration produces dense sponge.
- Folding Technique Delicate: This is a fundamental technique. Minimize mixing to preserve aerated foam structure.
- Baking Time Variable by Diameter: Thinner sponges (which are wider in diameter) bake faster. Always check visually and with toothpick test rather than relying solely on time.
- Cooling Rotation Critical: Quarter-turns every 15 minutes prevent sticking and distribution of air bubbles evenly. This step improves texture.
- Overnight Resting: Improves texture significantly. This is not optional for best results.
- Temperature & Weight: Do not substitute room-temperature eggs for cold eggs (affects incorporation timing) or reduce quantities (affects structure).
Variations
- Chocolate Sponge: Replace 30-40 grams flour with unsweetened cocoa powder (sift before folding).
- Flavored Sponge: Add 1-2 teaspoons vanilla, almond, or lemon extract to the yolk mixture.
- Liqueur Addition: Add 1-2 teaspoons liqueur (Cointreau, Grand Marnier, rum) to the yolk mixture for subtle depth.
Serving
- With Fillings: Any cream, ganache, jam, or mousse filling
- Layering: Slice horizontally into thin layers for multi-layer cakes
- Soaking: Can be lightly brushed with simple syrup or liqueur before assembly
- Temperature: Serve at room temperature or slightly chilled, depending on filling choice
Storage
- Room Temperature: 1 day in an airtight container (after 24-hour resting)
- Refrigeration: 3-4 days wrapped well
- Freezing: Up to 1 month (wrap very well before freezing; thaw at room temperature)
- Best Quality: 12-36 hours after baking (achieved during overnight resting period)
More like this
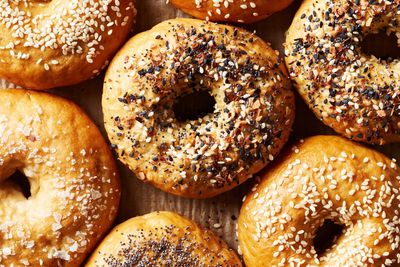
Bagels
A stiff bread dough - much firmer than sandwich bread - kneaded long, given a first rise, divided and shaped into rings, cold-proofed overnight in the fridge for flavour development, then boiled briefly in a sweetened water bath before baking. The boil sets the crust and gives the characteristic shiny mahogany surface; the bake finishes the inside. Topped with seeds while wet so they stick.
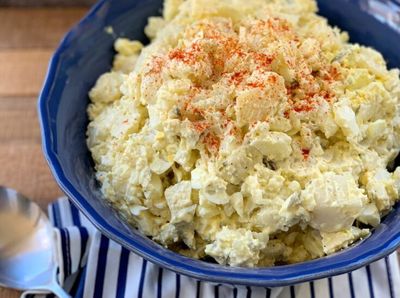
Classic American Potato Salad
Few dishes feel as woven into American summer as potato salad. It appears at backyard barbecues, church potlucks, and Fourth of July tables from Maine to Texas, and although every family insists their version is the only correct one, the bones are reassuringly consistent: waxy potatoes, hard-boiled eggs, a generous slick of mayonnaise, and the bright bite of mustard and pickle. The taste is creamy and cool, savoury with a gentle sweet-sour tang, punctuated by crisp celery and the sting of raw onion. It smells faintly of vinegar and paprika, like a 1950s deli counter on a hot afternoon. The texture is the real prize. Potatoes should be tender enough to yield to a fork but still hold their shape, so the salad reads as chunky rather than mashed. Difficulty is low, which is part of its charm. The only real technique is seasoning the warm potatoes so they drink in the vinegar before the mayo goes on, a small step that separates a flat salad from a great one. Make it the day before if you can. A night in the fridge lets the flavours marry, the onion mellow, and the dressing settle into every crevice, which is exactly what you want when you pull it out alongside burgers, pulled pork, or grilled chicken.

Ful Medames
Whole dried fava beans soak overnight, then simmer slowly until the skins soften and the beans are completely tender, they'll break down on the edges, stay whole at the heart. Garlic, lemon, cumin and salt mash through; a generous pour of olive oil at the end. Tomato, onion, parsley and a hard-boiled egg or two on top.
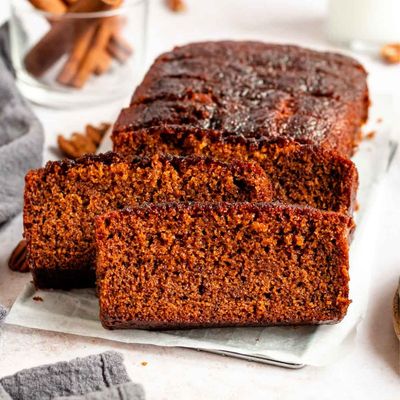
Honey Cake
A simple oil-based cake built around a generous pour of dark honey, brewed coffee for moisture and depth, and a quartet of spices (cinnamon, ginger, clove, allspice). Mixed in one bowl, baked low and slow. The crumb is dark and dense without being heavy; the flavour deepens overnight, which is why most Jewish households bake it a day or two ahead of the meal.